Collision Layers and Masks in Godot 4 – Tutorial
The concept of collision layers and masks in Godot 4 plays a crucial role in managing collisions and interactions between different elements in the game world. Understanding how to work with layers and masks is essential for creating complex and interactive game environments. This tutorial will guide you through the concepts of collision layers and masks in Godot 4.
Dear reader, please consider supporting my game ❤
What are Collision Layers and Masks
In Godot, collision layers and masks are used to control interactions between different elements such as objects, scenes, and physics bodies. This system allows for intricate control over the behavior and interactions of game objects in a scene.
Collision Layers essentially specify the category to which the object belongs. They indicate which layer or layers the object is associated with. (Object X exists on specified layers).
Collision Masks, on the other hand, determine the interaction between objects. They define the layers with which interaction will occur, allowing for precise control over which objects can interact with each other. (Object X will interact with other objects on specified layers).
If this does not make it any clearer for you, continue reading this quick tutorial about collision layers and masks.
Creating the Scene for Collision Layers and Masks in Godot 4
For this tutorial, I use a pack from kenney.nl. Those assets packs are always great, but you can use whatever you like, of course.
- Create a new Godot project.
- Go to Scene > New Scene and choose a Scene2D.
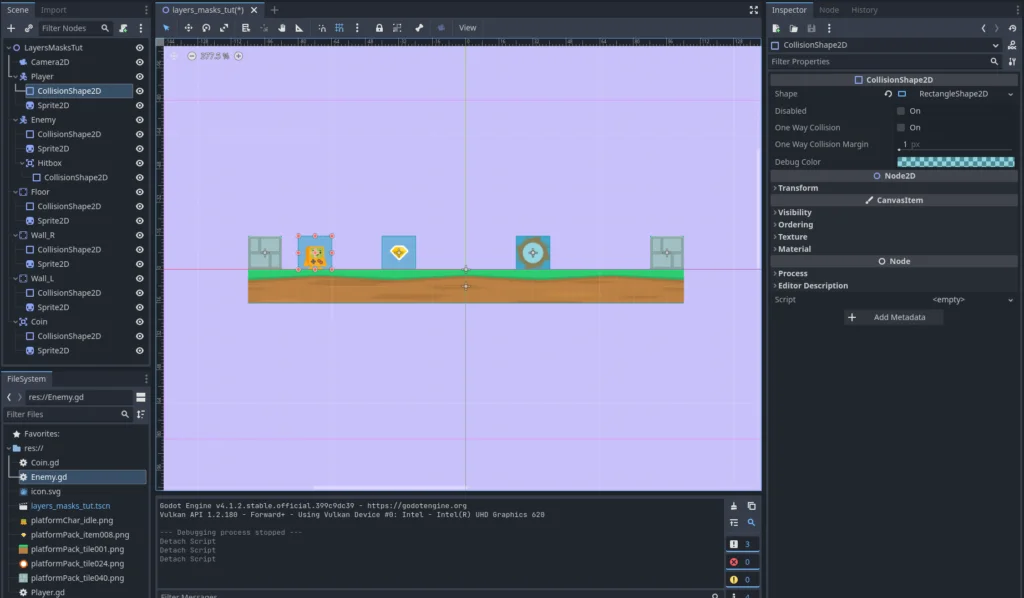
- First, let’s add a Camera2D node and tweak the zoom if necessary (in my case, it is 4.0).
- Now add a CharacterBody2D to the scene and call it “Player”.
- Below the Player, add a CollisionShape2D and a Sprite2D.
- Duplicate the Player and call it “Enemy”.
- Under Enemy, additionally add an Area2D node, call it “Hitbox” and add another CollisionShape2D under that.
- Next, add a StaticBody2D to the base scene.
- Under this StaticBody2D, again, add a CollisionShape2D and a Sprite2D.
- Then duplicate the StaticBody2D two more times.
- Call them “Floor”, “Wall_L” and “Wall_R”.
- Add another Area2D to the scene and call it “Coin”.
- Under it, add a CollisionShape2D and a Sprite2D.
- Add the appropriate images to all the Sprite2Ds.
- Also, add RectangleShape2Ds for all CollisionShape2Ds and more or less tailor them to fit the sprites (I have them all set to 16×16 pixels, except the floor, which is 208×16 pixels).
- At the end, the scene should look something like this:

Player, Coin and Enemy Behavior
- Next, we want the player, the coin and enemy to be able to move and interact.
- Attach a new script to the Player by clicking on it, and then click the green plus above the scene tree (Attach new Script).
- We keep this very simple. Add the following code to the player script:
extends CharacterBody2D

const SPEED = 90.0

@onready var sprite : Sprite2D = $Sprite2D

func _physics_process(_delta: float) -> void:
	# Input direction with arrow keys:
	var direction = Input.get_axis("ui_left", "ui_right")

	# Accelerate or stop
	if direction:
		velocity.x = direction * SPEED
	else:
		velocity.x = move_toward(velocity.x, 0, SPEED)

	# Move the CharacterBody2D
	move_and_slide()

func get_hit() -> void:
	# Just a tween to signal the player getting hit:
	var tween = create_tween().set_loops(3)
	tween.tween_property(sprite, "modulate", Color(1, 0, 0), .1)
tween.tween_property(sprite, "modulate", Color(1, 1, 1), .1)- Tip: If you want to learn more about the Tween, you can check out my tutorial about it.
- Next, click on the Enemy and add a script as well.
- Write the following code:
extends CharacterBody2D

const SPEED = 120.0

var direction = 1.0

@onready var hitbox : Area2D = $Hitbox

func _ready() -> void:
	# Connect the Area2D (Hitbox) signal "on body entered" to the function:
	hitbox.body_entered.connect(_on_body_entered)

func _physics_process(_delta: float) -> void:
	# When touching a wall, change direction:
	if is_on_wall():
		direction *= -1.0

	# Move the CharacterBody2D:
	velocity.x = direction * SPEED
	move_and_slide()

func _on_body_entered(body: Node2D) -> void:
	# Whenever the Player enters the Hitbox area of the enemy, call the get_hit function:
	if body.has_method("get_hit"): # Check if there is one first
body.get_hit()- And lastly, we add a script to the Coin and write the following:
extends Area2D

@onready var sprite : Sprite2D = $Sprite2D

func _ready() -> void:
	# Connect the Area2D (Coin) signal "on body entered" to the function:
	body_entered.connect(_on_body_entered)

func _on_body_entered(body: Node2D) -> void:
	# Whenever the Player enters the coin area, do the following
	# tween to signal the player getting the coin:
	var tween = create_tween()
	tween.tween_property(sprite, "position:y", -20.0, .5)
	tween.parallel().tween_property(sprite, "rotation_degrees", -360.0, .5)
tween.tween_callback(queue_free)- If we now run the game, we can see, that movement basically is working, but we have a couple of problems. First, the coin is somehow collecting itself or gets collected by the enemy and secondly, the enemy stops before hitting us and moves the other way (sometimes it will hit, since the hitbox and the collision box are the same size in my example):
Fix this with Collision Layers and Masks
- To fix this, we can use layers and masks.
- Let us name the needed layers in Project > Project Settings > 2D Physics.
- We call them “World”, “Player”, “Enemy” and “Collectibles”.

- If you now go to each object, under Collision, you can assign the corresponding layers and masks to it.

- First, let us assign the correct layers to each one:
- So, our Player is on the “Player” layer.
- The Enemy and the Hitbox are on the “Enemy” layer.
- Walls and Floor are on the “World” layer.
- And the Coin is on the “Collectibles” layer.
- Next, we also assign the correct masks:
- So the Player has to interact with the “World” layer for collision.
- The Enemy also has to interact with the “World” layer for collision.
- The Hitbox interacts with the “Player” layer, so that it can hit the player.
- The Floor and Walls don’t have to interact with anyone in this example.
- The Coin interacts with the “Player” layer, so that it can get collected by the player.
Wrapping up
Run the project again and test the interaction between the player and game objects. Everything should work as intended. You can control the player with the arrow keys. The enemy moves between the walls. The hitbox from the enemy can hit the player and only the player can collect the coin:
So, by following these steps, you’ve gained a practical understanding of how collision layers and masks work together in Godot 4. It’s important to note that the setup of the system can be tailored based on individual preferences and the specific requirements of the game. However, learning the differences between collision layers and masks in Godot 4 and leveraging them effectively can greatly streamline the development process.
Download the source files
If already subscribed, you can find all project files here. Otherwise, you can subscribe to the mailing list to get access to this and other project files for free and get notified, when a new tutorial is posted.


