Custom Key Bindings in Godot 4 – Tutorial
Custom key bindings are a great way to add flexibility and accessibility to your game. By allowing players to remap their controls, you can cater to a wider audience and provide a better overall gaming experience. In this tutorial, we’ll go over how to create custom key bindings in Godot 4. This tutorial will provide step-by-step instructions to get you started. So let’s dive in!
It’s important to note that this tutorial focuses solely on creating custom key bindings in Godot 4 with inputs from keyboard and mouse. It does not cover additional features like saving and loading key bindings, restoring default values, or working with all input devices such as game pads. But you can adapt and build upon the concepts and techniques covered in this tutorial to include these features and more. Don’t be afraid to explore and experiment with the tools Godot provides to make your game as user-friendly and accessible as possible.
Dear reader, please consider supporting my game ❤
Create a new Scene for custom key bindings in Godot 4
To get started, create a new project in Godot 4. You can do this by opening the Godot editor and clicking “New Project”. Give your project a name and choose a location to save it.
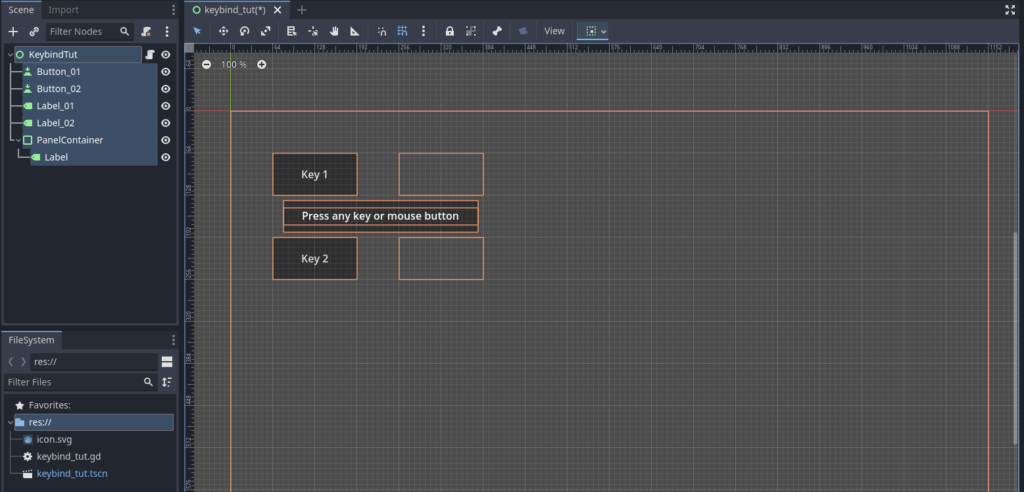
- Then, go to Scene > New Scene.
- Choose a Control Node (User Interface) as your base node and call it “KeybindTut”.
- Add two Buttons to it and call them “Button_01” and “Button_02”.
- Then add two Labels and call them “Label_01” and “Label_02”.
- And last but not least, add a PanelContainer and underneath it another Label.
- In the Inspector, write something like “Press any key or mouse button” into the text field of that label.
- Then add a script to the KeybindTut base node.
- Arrange everything like in the screenshot below (or however you see fit).

Change the Input Map
- Next, go to Project > Project Settings > Input Map.
- There, add two new actions and call them:
- “Button_01”
- “Button_02”
- We don’t have to add any events.
- Make sure to use the same name as your buttons, since in this tutorial, I use the button name for accessing the input action.

Add code to the script
Complete the following code in the script, that is attached to KeybindTut. I did put some comments in, so you know what part does what.
extends Control

var current_button : Button

@onready var button_01 : Button = $Button_01
@onready var button_02 : Button = $Button_02
@onready var label_01 : Label = $Label_01
@onready var label_02 : Label = $Label_02
@onready var info_panel : PanelContainer = $PanelContainer

func _ready() -> void:
	# Connect the buttons pressed signal:
	button_01.pressed.connect(_on_button_pressed.bind(button_01))
	button_02.pressed.connect(_on_button_pressed.bind(button_02))

	_update_labels() # called to refresh the labels

	info_panel.hide() # hide the PanelContainer

# Whenerver a button is pressed, do:
func _on_button_pressed(button: Button) -> void:
	current_button = button # assign clicked button to current_button
	info_panel.show() # show the panel with the info

func _input(event: InputEvent) -> void:
	if !current_button: # return if current_button is null
		return

	if event is InputEventKey || event is InputEventMouseButton:

		# This part is for deleting duplicate assignments:
		# Add all assigned keys to a dictionary
		var all_ies : Dictionary = {}
		for ia in InputMap.get_actions():
			for iae in InputMap.action_get_events(ia):
				all_ies[iae.as_text()] = ia

		# check if the new key is already in the dict.
		# If yes, delete the old one.
		if all_ies.keys().has(event.as_text()):
			InputMap.action_erase_events(all_ies[event.as_text()])

		# This part is where the actual remapping occures:
		# Erase the event in the Input map
		InputMap.action_erase_events(current_button.name)
		# And assign the new event to it
		InputMap.action_add_event(current_button.name, event)

		# After a key is assigned, set current_button back to null
		current_button = null
		info_panel.hide() # hide the info panel again

		_update_labels() # refresh the labels

func _update_labels() -> void:
	# This is just a quick way to update the labels:
	var eb1 : Array[InputEvent] = InputMap.action_get_events("Button_01")
	if !eb1.is_empty():
		label_01.text = eb1[0].as_text()
	else:
		label_01.text = ""

	var eb2 : Array[InputEvent] = InputMap.action_get_events("Button_02")
	if !eb2.is_empty():
		label_02.text = eb2[0].as_text()
	else:
		label_02.text = ""
That’s that with custom key bindings in Godot 4
After the steps above, save everything and run the scene. It should behave something like the video below. First click on any button, then press any key or mouse button. The label next to that button will display the new key. It will also delete the old key if it is already taken.
Congratulations! You’ve learned how to create custom key bindings in Godot 4. By allowing players to remap their controls, you’ve made your game more accessible and user-friendly. Remember that this is just one way to implement custom key bindings – there are many other approaches you can take depending on your game’s specific needs. Don’t be afraid to experiment and try out different solutions. As always, if you have any questions or comments, feel free to reach out to the Godot community or consult the official documentation. Happy coding!
Download the source files
If already subscribed, you can find all project files here. Otherwise, you can subscribe to the mailing list to get access to this and other project files for free and get notified, when a new tutorial is posted.


