Tweens in Godot 4 – Tutorial
Tweens in Godot 4 are a way to animate properties of a node over a specified period of time. This is done by interpolating between the node’s starting value and ending value using a specific easing function. Godot 4 comes with a new and improved tween system that allows for more control and flexibility in creating animations.
In this quick tutorial, we will cover everything you need to know about using tweens in Godot 4. We will start by introducing the basics of tweens, including how to create a tween with a specific easing function. And we will discuss the different easing and transition functions available in Godot 4 and how to use them to create different types of animations.
By the end of this tutorial, you should have a good understanding of how tweens work and how to use them to create animations in your Godot 4 projects. Let us begin!
Dear reader, please consider supporting my game ❤
Creating Tweens in Godot 4
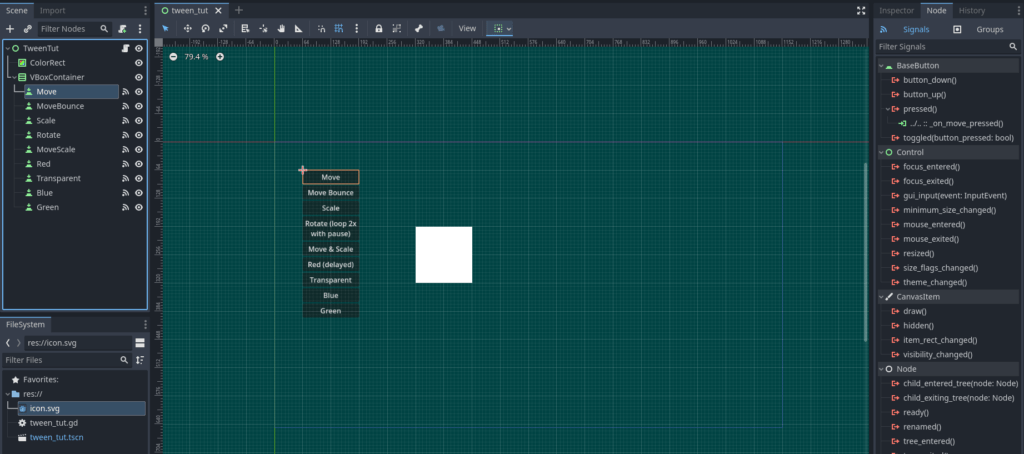
- Open Godot 4 and create a new Scene.
- Add a Control Scene and call it “TweenTut”.
- Additionally, add a ColorRect.
- Under that, add a VBoxContainer.
- Create 9 Buttons under it and call them
- “Move”
- “MoveBounce”
- “Scale”
- “Rotate”
- “MoveScale”
- “Red”
- “Transparent”
- “Blue”
- “Green”
- Add a Script to TweenTut and connect every
pressed()signal to that script. - Your scene should now look something like this:

And your script should look like this (also add the var tween and the @onready var colorRect):
extends Control

var tween : Tween

@onready var colorRect : ColorRect = $ColorRect

func _on_move_pressed() -> void:
	pass # Replace with function body.

func _on_move_bounce_pressed() -> void:
	pass # Replace with function body.

func _on_scale_pressed() -> void:
	pass # Replace with function body.

func _on_rotate_pressed() -> void:
	pass # Replace with function body.

func _on_move_scale_pressed() -> void:
	pass # Replace with function body.

func _on_red_pressed() -> void:
	pass # Replace with function body.

func _on_transparent_pressed() -> void:
	pass # Replace with function body.

func _on_blue_pressed() -> void:
	pass # Replace with function body.

func _on_green_pressed() -> void:
	pass # Replace with function body.
Now you can add the following snippets, one by one, to the corresponding function:
Change property of tweens in Godot 4
Create a new tween and change a property like the position:
func _on_move_pressed() -> void:
	tween = create_tween() # Creates a new tween

	# Change position.x to 512 over 2 seconds:
	tween.tween_property(colorRect, "position:x", 512, 2.0)

	# After the first tween completed, the second will execute:
	tween.tween_property(colorRect, "position:x", 320, 1.0)
Set transition and ease types
You can add transition and ease types to the tween. For more information about what they do, check further down below.
func _on_move_bounce_pressed() -> void:
	tween = create_tween()

	# Change position x to 512 over 2 seconds
	# Also add a bounce at the end of the transition:
	tween.tween_property(colorRect, "position:x", 512, 2.0).set_trans(Tween.TRANS_BOUNCE).set_ease(Tween.EASE_OUT)
	tween.tween_property(colorRect, "position:x", 320, 1.0)
Change different properties
You can change almost every property. Here, we change a Vector2.
func _on_scale_pressed() -> void:
	tween = create_tween()

	# Double the scale over 2 seconds:
	tween.tween_property(colorRect, "scale", Vector2(2.0,2.0), 2.0)
	tween.tween_property(colorRect, "scale", Vector2(1.0,1.0), 1.0)
Loop tweens and pause between them
You can loop tweens by setting the set_loops(). If it is empty, it will loop indefinitely. Use the tween_interval() to set a pause between two tweens (in seconds).
func _on_rotate_pressed() -> void:
	tween = create_tween().set_loops(2) # loop the tween 2 times

	# Rotate for 90 degrees over 1 second
	# will rotate 2 times because of the loop:
	tween.tween_property(colorRect, "rotation_degrees", 90, 1.0)
	tween.tween_interval(1) # wait for 1 second before continuing
	tween.tween_property(colorRect, "rotation_degrees", -90, 1.0)
	tween.tween_interval(1) # wait for 1 second before repeating
Execute tweens simultaneously
With parallel() you can change different properties at the same time. You can use chain() to execute a tween after the previous tween finished.
func _on_move_scale_pressed() -> void:
	tween = create_tween().set_parallel(true) # tweens will transition at the same time

	# Change position.x to 512 and also
	# change the scale simultaneously:
	tween.tween_property(colorRect, "position:x", 512, 2.0)
	tween.tween_property(colorRect, "scale", Vector2(2.0,2.0), 2.0)

	# You can use chain() to execute this tween afterward:
	tween.chain().tween_property(colorRect, "position:x", 320, 1.0)

	# And use parallel() to execute this tween simultaneously to the previous one:
	tween.parallel().tween_property(colorRect, "scale", Vector2(1.0,1.0), 1.0)
Delay tweens in Godot 4
Use set_delay() to delay a tween (in seconds):
func _on_red_pressed() -> void:
	tween = create_tween()

	# Use set_delay() to delay the execution of a tween:
	tween.tween_property(colorRect, "color", Color.RED, 1.0).set_delay(1.0)
	tween.tween_property(colorRect, "color", Color.WHITE, 1.0)
Change transparency
To change specific properties, like only the alpha channel for example, you can use “modulate:a”:
func _on_transparent_pressed() -> void:
	tween = create_tween()

	# You can access specific properties like so:
	tween.tween_property(colorRect, "modulate:a", 0.0, 2.0)
	tween.tween_property(colorRect, "modulate:a", 1.0, 1.0)
Callback
Use callback(), to call any function:
func _on_blue_pressed() -> void:
	tween = create_tween()

	# with callback you can call any function:
	tween.tween_callback(_set_blue)
	tween.tween_property(colorRect, "color", Color.WHITE, 1.0).set_delay(1.0)

func _set_blue() -> void:
	colorRect.color = Color.BLUE
Method
A similar possibility is to use tween_method(). The difference is, that you can use this to call it repeatedly over a time span:
func _on_green_pressed() -> void:
	tween = create_tween()

	# A similar approach is to call tween_method().
	# here the function is called repeatedly over a time period
	tween.tween_method(_set_green, Color.WHITE, Color.GREEN, 2.0)
	tween.tween_property(colorRect, "color", Color.WHITE, 1.0).set_delay(1.0)

func _set_green(col: Color) -> void:
	colorRect.color = col
Try out the tweens in Godot 4
Save everything after updating the code and run the scene. It should work correctly, and you should be able to test all the different stuff we just added:
Additional info about transitions and eases
Godot 4 uses both transition types and ease types to define the motion of animations. Whereby transition types handle the timing of the animation, while ease types apply the transition to the interpolation at either the beginning, the end, or both. As a result, both ease types and transition types can help to create smooth and natural-looking animations. You can find more information about it in the official documentation.
Tween Cheatsheet for Godot 4
If you need a cheatsheet, for how exactly the tween will behave, check out my interactive tool on itch.io:
That’s mostly it about tweens in Godot 4
Great! You have completed this tutorial on using tweens in Godot 4. You should now have a good understanding of how tweens work and how to use them to create animations in your projects.
I hope you found this tutorial helpful and that you are now ready to start creating awesome animations using tweens. Happy coding!
Download the source files
If already subscribed, you can find all project files here. Otherwise, you can subscribe to the mailing list to get access to this and other project files for free and get notified, when a new tutorial is posted.


